
Getting Started –Aerial Photography and Our Collection
Everything you should know or questions we are often asked about aerial photography and our collection. All of the aerial photography displayed in our website was taken from aircraft. None of the imagery was captured from satellite.
The oldest aerial imagery in our collection is believed to be dated 1920 and was taken along the State of New Jersey Atlantic shore from Cape May to Sea Bright and Sandy Hook. View of Atlantic City, New Jersey in the year 1920
The imagery displayed on our website is entirely vertical aerial photography, taken straight down as opposed to oblique photographs, taken at an angle.
Looking Back – A Very Brief History of Aerial Photography
Aerial photography is believed to have its origin in 1839 with a photo of Paris, France taken from the roof of a tall building. The technology at the time (daguerreotypes, also known as tintypes) required very long exposure times with the camera remaining stationary during exposure. Other than placing a camera on top of a building or on a hill, there was no practical solution for keeping a camera stationary for long periods of time while high above the ground.
The development of wet plates allowed for much shorter exposure times but required the photographic plate to be exposed and developed in only twenty minutes. So, in 1858 a Frenchman name Gaspar Felix Tournachon (who later went by “Nadar”) outfitted the basket of a hot air ballon with a camera, darkroom and all the equipment and materials need to develop the photographic plates. Nadar tethered this balloon 80 meters above the ground and took a photo of Petit-Becetre, France. In 1860, James Wallace Black similarly photographed Boston from a hot air ballon. Black’s photo is the oldest known aerial photograph still in existence.
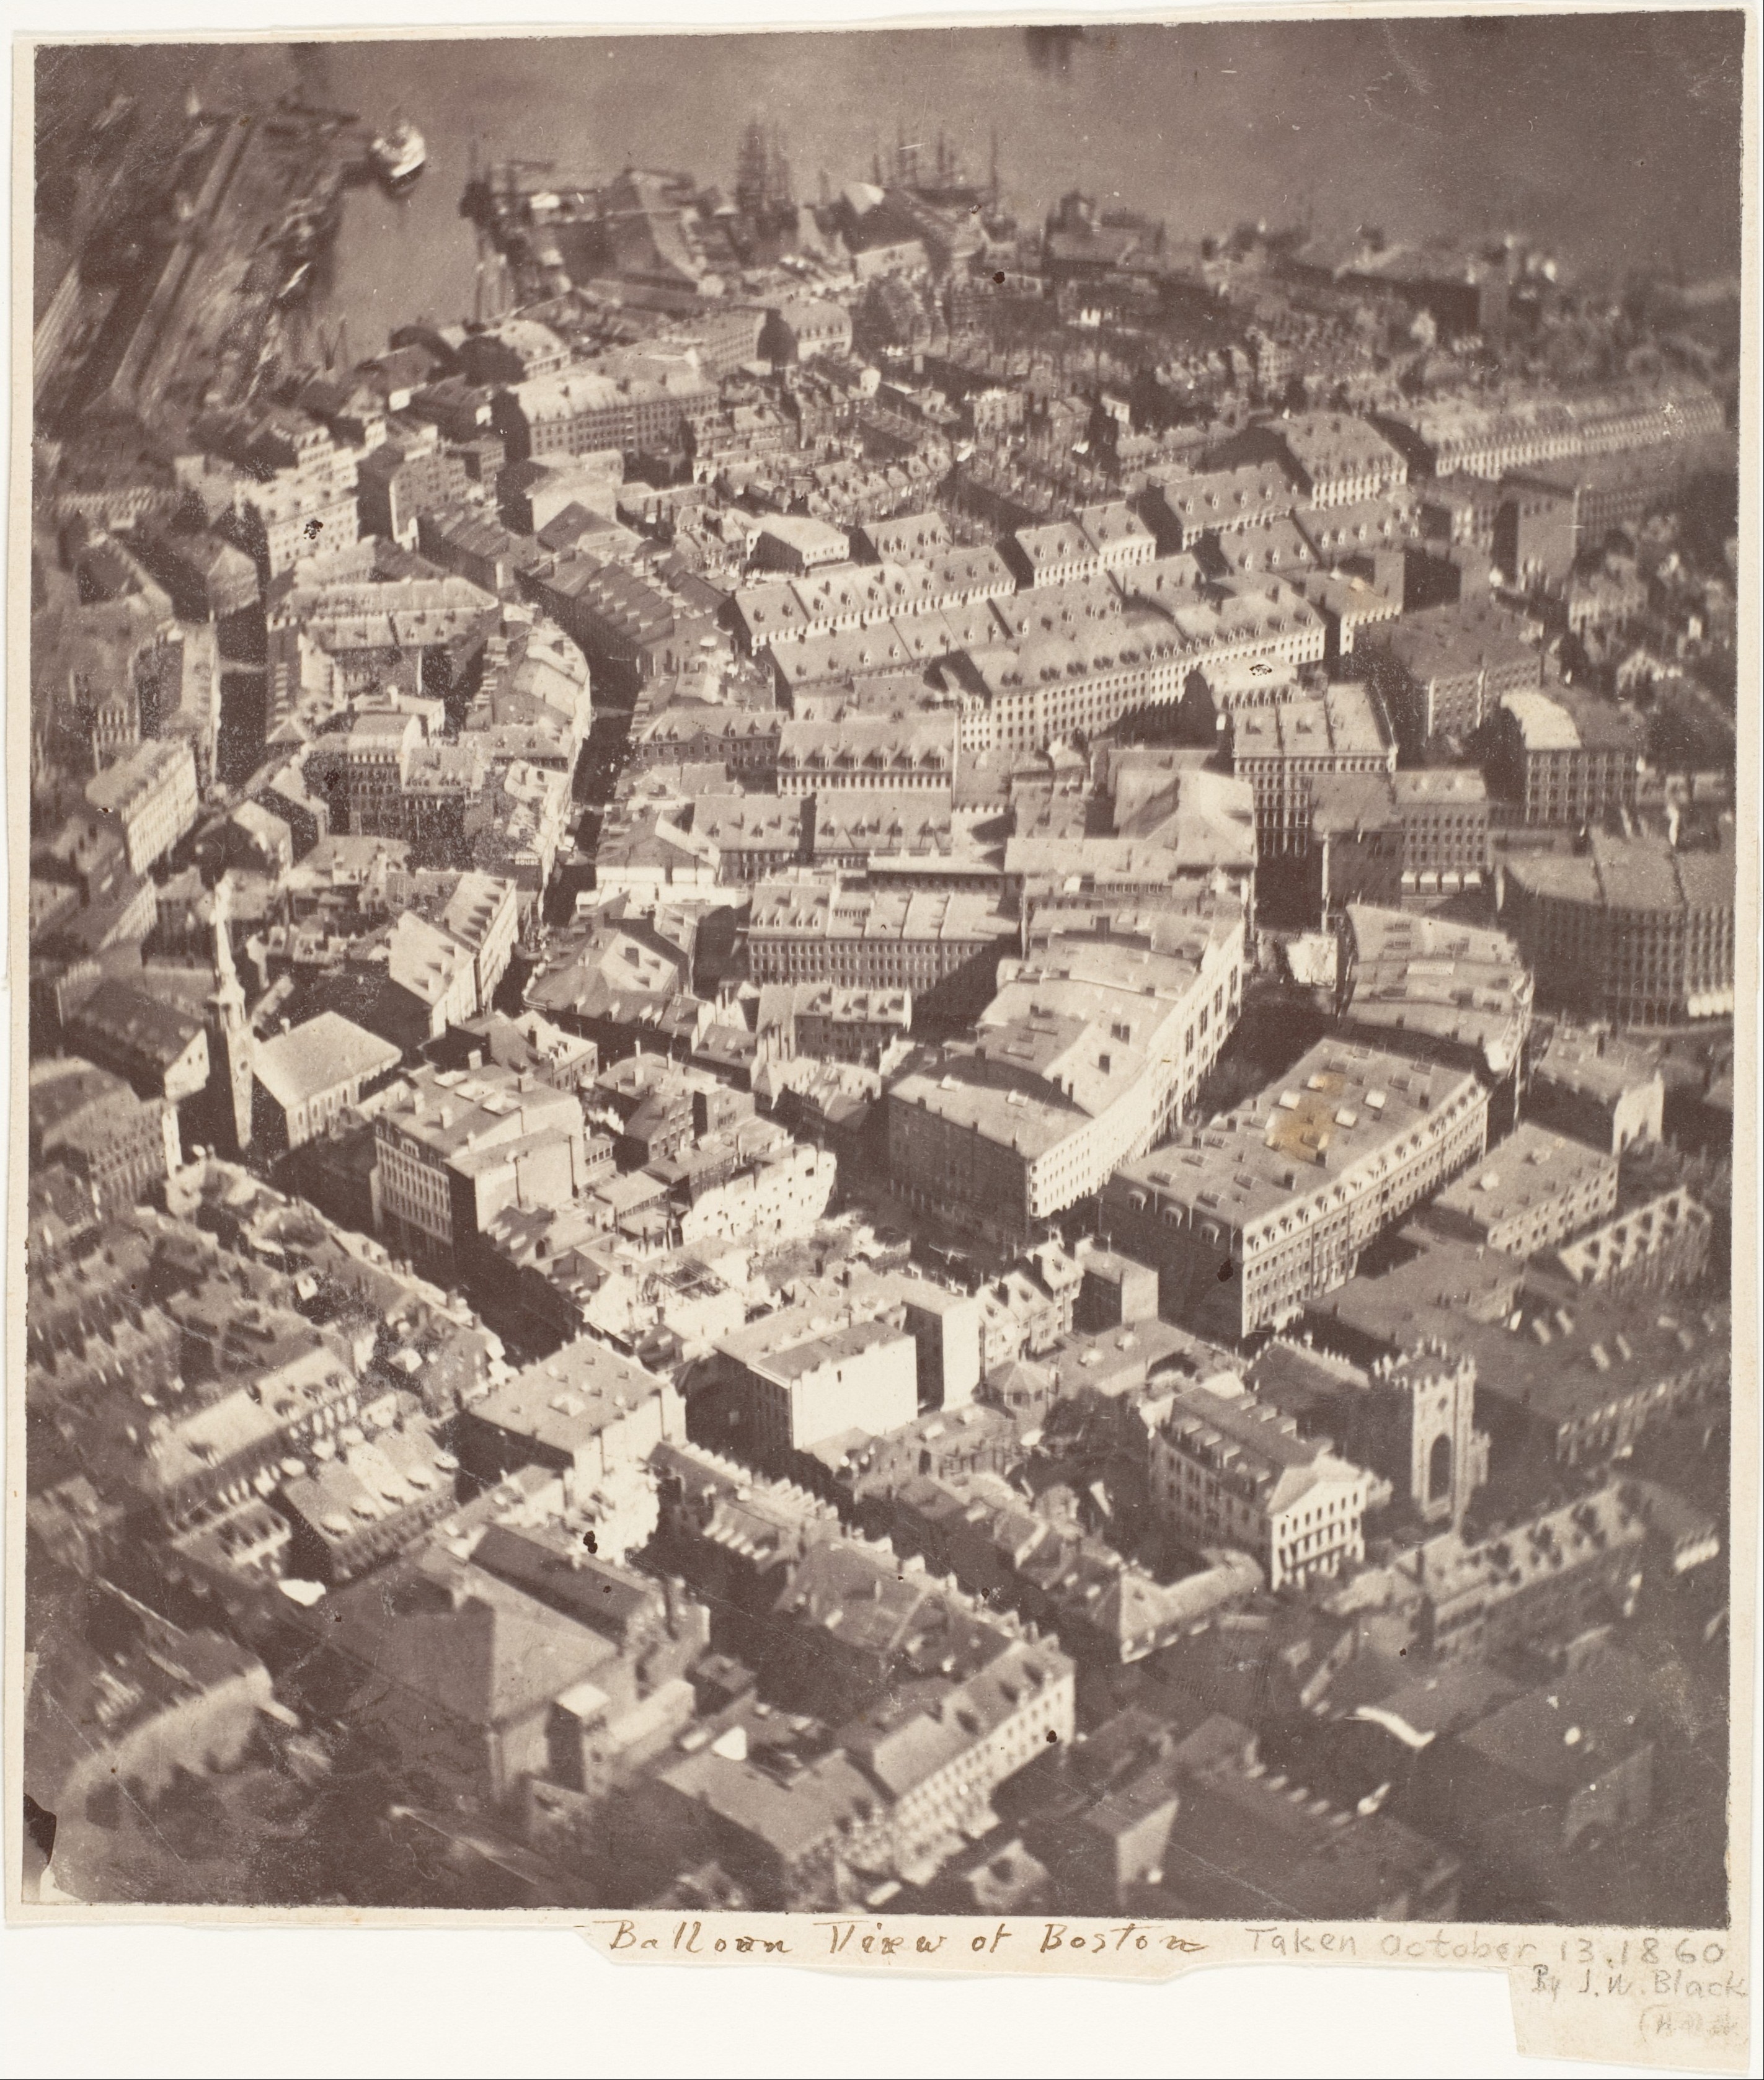
Figure – Aerial Photo of Boston, MA 1860
James Wallace Black, Metropolitan Museum of Art
As wet plates were replaced by a new technology, dry plates that did not require immediate developing, experimentation began with new aerial photography platforms. These included the successful (and patented ) use of carrier pigeons with breast-mounted cameras in 1903 and an attempt in 1906 to use a rocket to launch a camera which returned to earth with a parachute.
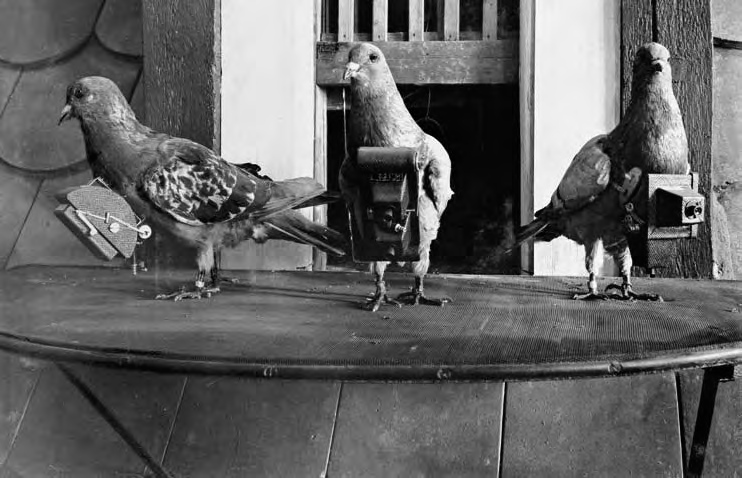
Carrier Pigeons with Breast-mounted Camera
Julius Neubronner – WikiMedia Commons
In 1906 a photo of San Francisco was taken using several kites strung together. This famous photo documented the results of the 1906 earthquake. Around this time kites were a popular method for aerial photography.
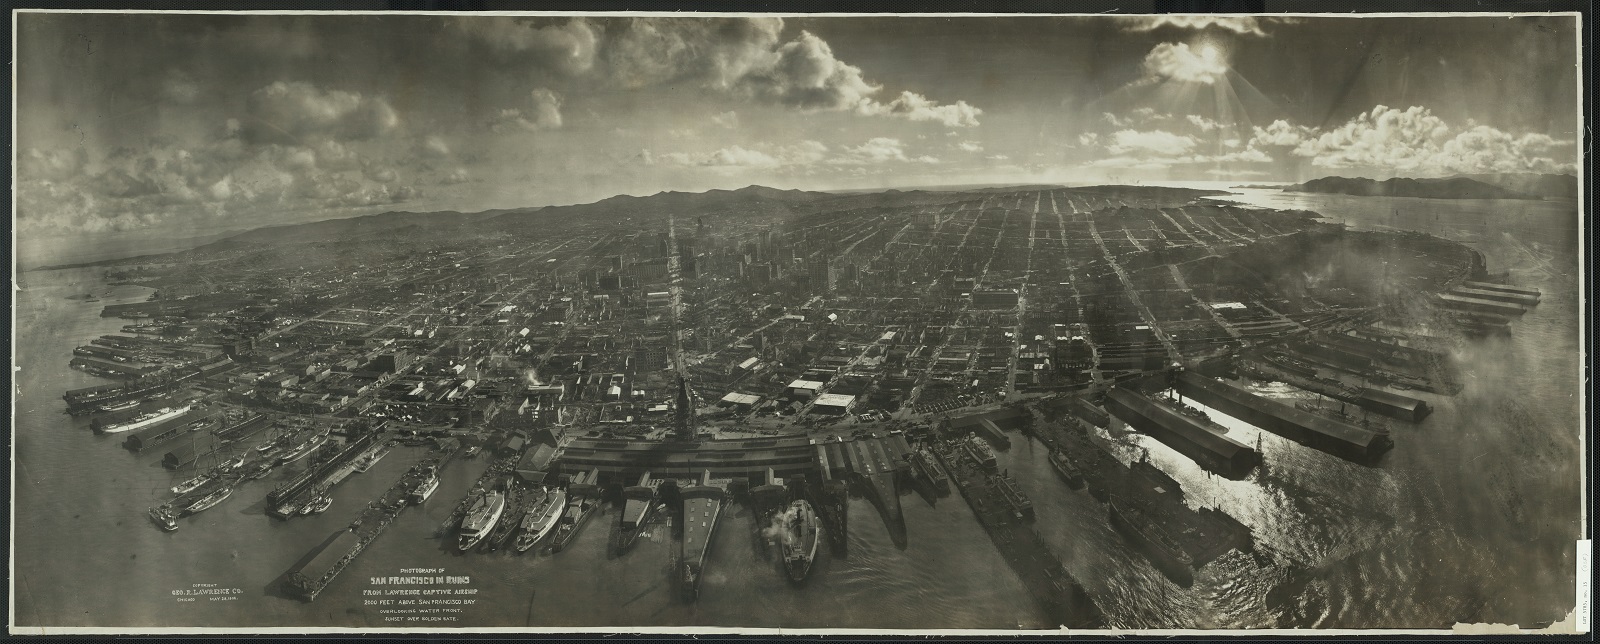
San Francisco, CA 1906
George Lawrence—Prints & Photographs Divison/Library of Congress
Wilbur Wright is credited with the first aerial photo taken from an airplane. In 1909 he took an aerial photo of Centrocelli, Italy. Military uses of aerial photography expedited advancements in airplane and photograph technology.
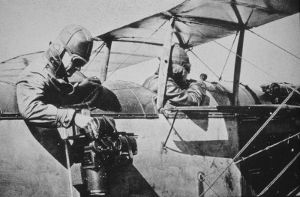
WWI Aerial Photographer
Sherman Fairchild developed an aerial camera system which greatly improved photo clarity and included the ability to set the interval at which photos could be taken. The Fairchild camera was so well designed it was the standard of aerial photography for 50 years. However, after World War I the military was not ordering cameras and Fairchild needed to find a new market. He contracted with several government agencies which quickly found aerial photographs an important tool for keeping property tax rolls up to date and property tax assessments, a practice that is still used today.
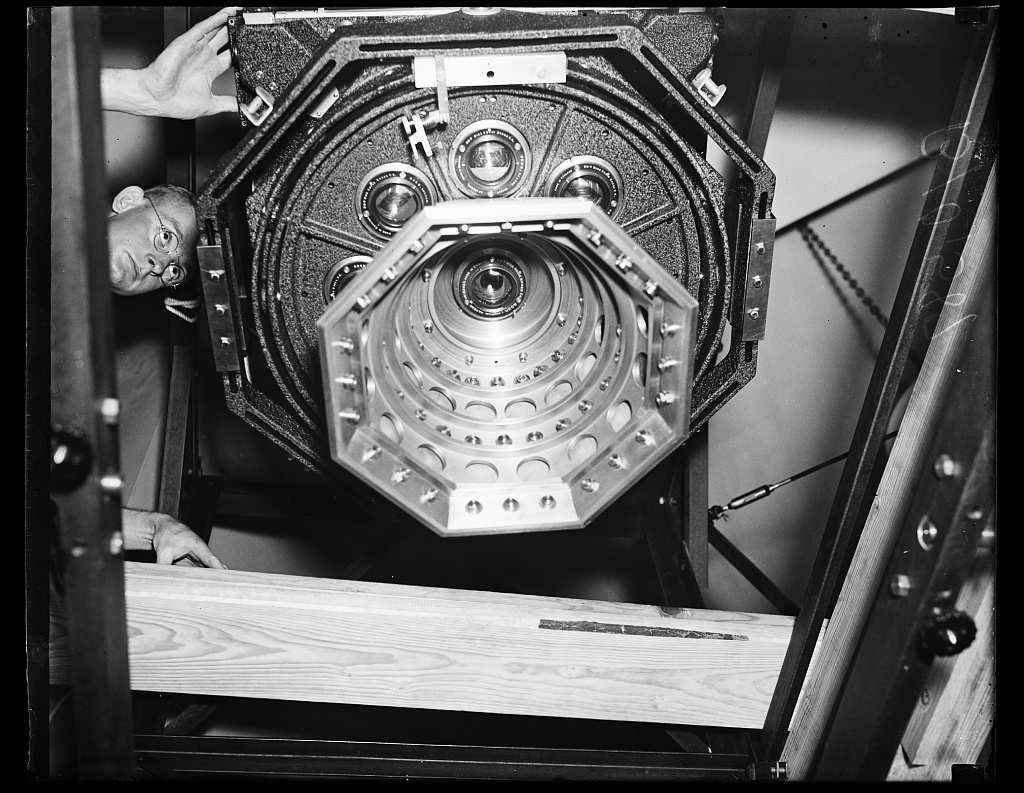
9-lens aerial mapping camera made by the Fairchild Aerial Camera
Harris & Ewing, Library of Congress
From Camera to World Wide Web
This is an overview of how aerial photos are processed for web delivery. It is a brief and simplified explanation of the process in the hopes it is interesting, understandable, and not too technical.
The first step in preparing aerial photos for web delivery is digitizing, or scanning, the photographic negatives. This requires a highly specialized scanner capable of delicately handling 9” x 9” rolls or cut negatives. These scanned photos are stored digitally, typically as a tiff file.
Next, HistoricAerials.com’s Photogrammetrists begin producing geometrically corrected images (commonly called ortho’s) from the scanned images. An ortho is an image that has been geometrically corrected (orthorectified) to adjust for the shape of the earth’s surface, the angles of the camera relative to the earth’s surface, and camera lens distortion.
Before a scanned image can be orthorectified, a spatial relationship must be established between the scanned image and a reference image. The reference image is an orthorectified image of the same area as the scanned image. The reference image also has location information stored in its file so coordinates can be determined for the location of any object in the image. When we first launched the website our photogrammetrists would establish a spatial relationship between the scanned image and the reference image by identifying landmarks common to both images. Using software the photogrammetrists would use a mouse to place corresponding points on the scanned and reference image for each common landmark they decide to use. Intersections of streets, driveways and sidewalks were often used as landmarks. The software records the location for points on the reference image along with file coordinates for the corresponding points on the scanned image. Over time this manual process has been streamlined with the use of new software that utilizes facial recognition technology for the collection of points.
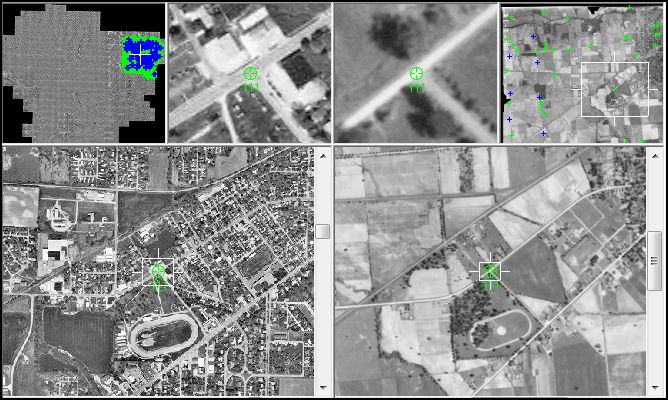
Measuring Points. Reference image on left, scanned image on right.
The above procedure is for one photo. After collecting enough reference points it’s time to move on to the next photo and repeat the process. The second photo overlaps the first photo and some of the same landmarks can be used. As we progress, a quilt of overlapping photos. The blue and green “blob” in the upper left frame of the above figure. Are all the points collected (over 4000) for this dataset of 128 photos of White County, IL 1938. The software tries to make sense of the locations of all these points while considering other parameters such as the height of the plane, focal length of the camera lens, angles of the camera relative to the ground, and the scan resolution when the photo film was digitized.
Often when dealing with older historical photography these parameters are not known or are incorrect. I’m sure there wasn’t much forethought in regards to computer processing of aerial photos back in the 1940’s… or 1930’s… or 1920’s, and much of this information has either been destroyed, lost, or is otherwise irretrievable. Fortunately, we have developed methods for projects lacking this information. Some of the procedure are beyond the scope of this discussion. Let’s just say our staff has devised some very creative solutions to complete some amazing work.
The file coordinates for the scanned image are based on the location of the pixel where the point is placed. Without getting too in depth, scanned images are raster images. Raster images are based on a grid. Each cell in the grid represents a pixel. The location of each pixel with the grid defines its file coordinates.
After many points are collected the software establishes a spatial relationship between the reference and scanned image is ready to be orthorectified. In the orthorectification process, values of the pixels are rearranged to move objects closer together or farther apart. To see an example look at the change in the shape and size of the large shadow are in the raw image and same area in the orthorectified image (see below). Also note the straight edge along the top of the raw image and curved shape of the same area in the orthorectified image.
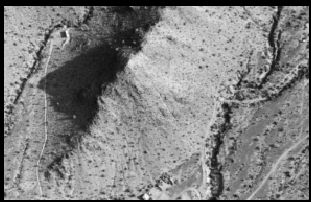
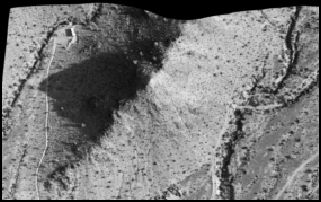
Raw Image on left and orthorectified image of the same area on the right. Note the change in the shape of the edges of the photo and the shape of the shaded area. Phoenix, AZ 1982.
Before, we continue, let us address a couple of questions that may have come to mind.
-
If we are using an ortho to orthorectify the raw photo how did the ortho get orthorectified? (Chicken or the egg???) Somewhere along the line a different source such as a map was used to compare landmarks and produce the reference ortho.
-
The primary purpose of HistoricAerials.com is to observe changes in an area through time. If areas have changed, how do we compare common landmarks? (Great question!) Streets are widened or two-lane highways become eight lane freeways, farms become housing communities and so on. Fast growing areas or large differences in time between the reference and scanned images also present challenges. Other obstacles are forests, swamps, mountains, rivers and lake. Fortunately, most image scans cover a reasonably large area. Some of the larger images we work with can cover about 8 miles in each direction, and the smaller imagery (flown closer to the ground with greater detail) still covers around a quarter of a mile. Typically, even with drastic change to an area, there are still several identifiable locations that can be utilized in the comparison process. When the change is extreme and the image is too small to get a great comparison, other options may need to be considered to get a successful orthorectification. Such as using an older reference image. For example, if the change between a reference image in 2010, and the raw image scan from 1950 is so drastic that there are no identifiable commonalities, a reference image may be used from the 1970’s. Major metropolitan areas with substantial growth like Phoenix, Atlanta, and Dallas (just to name a few) are prime examples of where this tactic may be used on the outskirts or suburbs. What once was farmland may now be multiple subdivision. Working backwards through time can allow the photogrammetrists to compare the imagery to a more gradual change. The links below show an area of land in Franklin County, IL and the same area after a dam was constructed. Be sure to try the slide tool to compare between years.
After our photogrammetrists have collected points on an entire dataset of photos (which can range from a few dozen to several thousand photos with thousands to millions of points) and refined the collected points so the software can understand and properly place the photos so they overlap seamlessly and accurately. They will complete the orthorectification process which will allow them to construct a mosaic of photos using the best areas of each photo along with any necessary graphic improvements to create a single image of the entire project area. After several more steps the image has been run through quality control, prepared for delivery and transferred to its final storage location. Next it is added to the aerial photo database along with source information and photo dates and released for web delivery. It can be a long and tedious task but the reward of seeing a project completed and our database continue to grow is well worth it.
We hope you found this informative and interesting. Also, check out our E Book How to Save Time on Your Phase I ESA Generation. We enjoy your feedback so let us know how we are doing by posting in our Forum. Return to HistoricAerials Homepage.